This node is part of the Aivo category and allows you to incorporate the interactive list plugin into Web and WhatsApp channels.
| ℹ️ Its function is key to facilitate the implementation of an Appointment Scheduling Flow, making it more accessible and comprehensive. Otherwise you would have to generate intentions in the AgentBot platform that replace the interaction between each next step, of the options available in the interactive list. |
 In the video below learn about all the properties available in this node:
Download the example flow at this link.
 Below you also have a description of the fields that you will use in the process:
- Name: is the space available for you to customize the name of the node, which you will then view from the Studio workspace.
- Type: is a mandatory selection and determines the type of Interactive List to implement. You can choose between:
- Message: you must generate an intent in the AgentBot platform, to obtain the selection of the Interactive List. That is, this option allows you to activate an intention when the user clicks, which will be interpreted by AgentBot, bringing the associated response.
- Next Step,
- Bot: it is mandatory for this case. You will see all the bots you have access to listed so you can select where this node will run.
- Next Step: you will indicate what step will follow once the user finishes the selection in the Interactive List.
- Ref: it is a mandatory data, to be completed with the name of the internal identifier of where the information provided by the user will be stored.
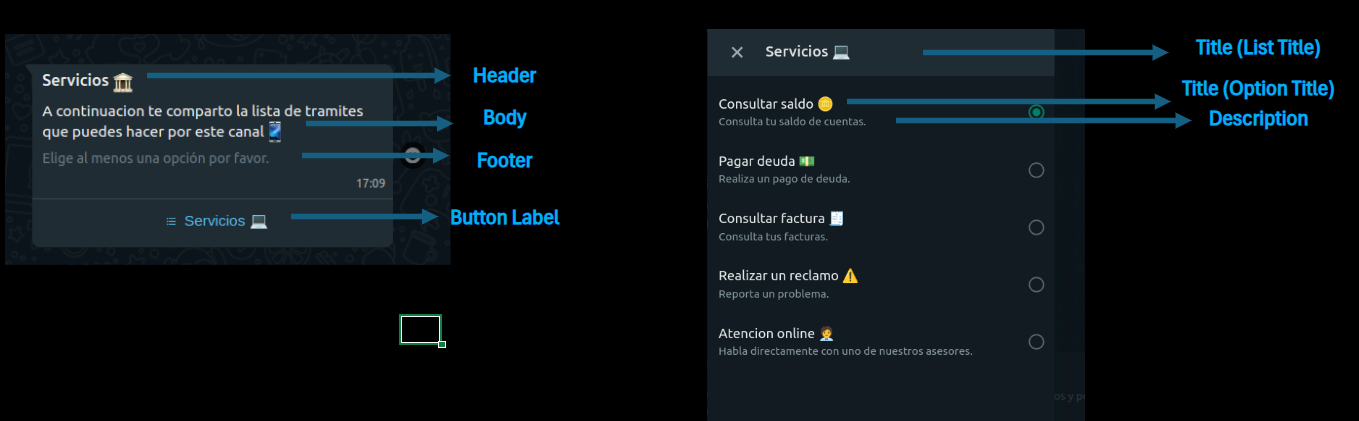
- Header: optional field. It will be the header text of the Interactive List.
- Body: mandatory field to complete. It is the body text of the Interactive List, which the user will view.
- Footer: optional field, where you can add a line of text, which will be displayed at the end of the initial message, before entering the list.
- Title: required field. You will type the title of the list, which can contain up to 64 characters.
- Button Label: is the space where you will include the text that the user will see, in the button that will give them access to the Interactive List.
- Options: you can include more options in the list by clicking Add option and you will remove them by clicking Remove option. You will complete in each one:
- Value: internal identifier where the information provided by the user will be stored when selecting an option.
- Title: is the text that titles this specific option in the list. Maximum of 64 characters.
- Description: informative text about an option within the list. Maximum of 64 characters.
Here is a visual example of each item
|
 Key data: